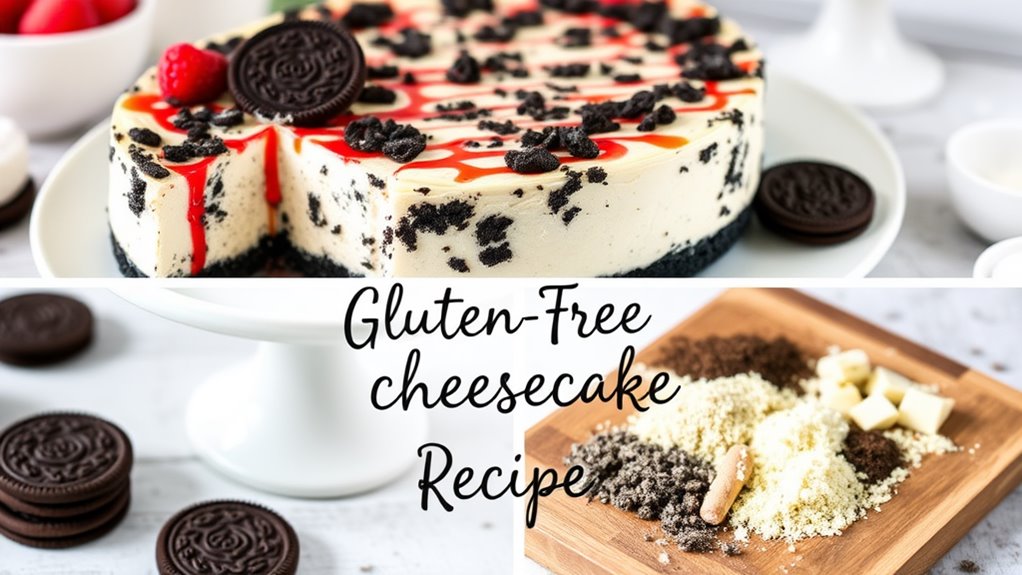
Gluten Free Oreo Cheesecake Recipe
You might think that making a gluten-free dessert means sacrificing flavor, but that’s not the case with this Oreo cheesecake recipe. It combines the rich taste of cream cheese with a crunchy Oreo crust, creating a delicious treat suitable for everyone. Plus, it’s easy to prepare, so you won’t spend hours in the kitchen. Stick around to discover the simple steps and tips to make this cheesecake a hit at your next gathering.
Why You’ll Love This Recipe
When you try this gluten-free Oreo cheesecake recipe, you’ll quickly discover why it’s a favorite among dessert lovers.
First, the creamy texture combines perfectly with the crunchy Oreo crust, creating a delightful contrast. You’ll appreciate how easy it’s to make, requiring just a few simple ingredients that you can find at any grocery store.
Plus, it’s a crowd-pleaser, great for parties or family gatherings. You won’t have to worry about gluten sensitivities, making it suitable for everyone.
Each bite is rich and indulgent, satisfying your sweet tooth without the guilt.
Finally, you can customize it by adding toppings like whipped cream or chocolate drizzle, making it even more special. Enjoy the deliciousness of this easy-to-follow recipe!
History
Cheesecake has a long and fascinating history that dates back thousands of years. Originating in ancient Greece, it was served to athletes during the first Olympic Games in 776 B.C. The Greeks used simple ingredients like cheese, honey, and flour, creating a dish that was both nourishing and delicious.
As time went on, the Romans adopted cheesecake, spreading it across Europe. By the Middle Ages, different regions began to develop their own variations, incorporating local ingredients.
The classic New York-style cheesecake emerged in the early 20th century, thanks to the introduction of cream cheese.
Today, with the rise of dietary preferences, you can enjoy many versions, including gluten-free options, showcasing how this timeless dessert continues to evolve.
Recipe
Ingredients:
– 24 gluten-free Oreo cookies
– 4 tablespoons unsalted butter, melted
– 16 oz cream cheese, softened
– 1 cup granulated sugar
– 1 teaspoon vanilla extract
– 3 large eggs
– 1 cup sour cream
– 1/4 cup cocoa powder (optional)
– Extra gluten-free Oreos for garnish (optional)
Cooking Instructions:
-
Preheat your oven to 325°F (160°C). Begin by preparing the crust. In a food processor, crush the gluten-free Oreo cookies until they resemble fine crumbs.
-
Combine the crumbs with the melted butter in a mixing bowl and stir until the mixture is well combined.
-
Press the Oreo crumb mixture firmly into the bottom of a 9-inch springform pan to form an even layer. Bake the crust in the preheated oven for 10 minutes, then remove and allow it to cool while you prepare the filling.
-
In a large mixing bowl, beat the softened cream cheese with an electric mixer until smooth and creamy. Gradually add the granulated sugar and continue mixing until fully incorporated.
-
Mix in the vanilla extract.
-
Add the eggs one at a time, mixing well after each addition. Confirm the mixture is smooth and well combined.
-
If using cocoa powder, fold it into the mixture at this stage until evenly distributed.
-
Pour the cheesecake filling over the cooled Oreo crust in the springform pan. Smooth the top with a spatula.
-
Bake in the preheated oven for 50-60 minutes, or until the center is set but still slightly jiggly.
-
Once done, turn off the oven, crack the door open, and let the cheesecake cool in the oven for 1 hour. This helps prevent cracking.
-
After an hour, remove the cheesecake from the oven and let it cool to room temperature. Refrigerate for at least 4 hours, or overnight for best results.
-
Before serving, garnish the cheesecake with extra gluten-free Oreos or your choice of toppings.
-
Carefully remove the cheesecake from the springform pan and slice it into pieces.
Extra Tips:
To verify the cheesecake sets perfectly, make sure to use room temperature ingredients, especially the cream cheese and eggs. This helps create a smooth batter and prevents lumps.
Additionally, for a creamier texture, consider using a water bath during baking by placing the springform pan in a larger pan filled with water.
Enjoy your gluten-free Oreo cheesecake straight from the refrigerator for the best taste and texture!
Final Thoughts
As you wrap up your baking adventure, remember that letting the cheesecake chill for several hours or overnight can make a big difference in taste and texture. This step allows the flavors to meld beautifully, enhancing the overall experience.
When you finally slice into your gluten-free Oreo cheesecake, you’ll enjoy a creamy, rich dessert that satisfies your sweet tooth while being gluten-free. Don’t rush the process; patience is key.
If you’re sharing this treat, consider garnishing it with extra crushed Oreos or a drizzle of chocolate sauce for added flair.
Finally, enjoy the compliments from friends and family. You’ve created something special, and that’s worth celebrating.
Happy baking, and may your cheesecake adventures continue!
FAQ
When you’re new to baking gluten-free desserts, you might’ve questions about specific ingredients or techniques. One common question is, “Can I substitute gluten-free flour for regular flour?” Yes, you can, but make sure to use a blend designed for baking.
Another frequent query is about gluten-free Oreos; they’re safe to use, but always check the packaging for cross-contamination warnings. You might also wonder about storage; this cheesecake keeps well in the fridge for up to five days.
If you’re concerned about texture, be sure to let the cheesecake cool completely before slicing. Finally, don’t hesitate to get creative with toppings—fresh berries or chocolate sauce work great!
If you have more questions, feel free to ask!